If you are planning to start a blog and want to know the step by step process for creating it, then you are in the right place. In this post, I will try to cover how to start a blog strategically. Hence this will be a long post but informational, so grab a cup of coffee and start reading.
As a beginner, you must ask yourself why you should start a blog? Is blogging worth your time? What are your goals for blogging?
Most of the new blogger ignores this question but let me tell you blogging is not a one-day job. It is a small step towards a long journey. Hence you must be clear with your purpose else you will end up wasting your time and energy.
Well, every blogger starts a blog for various reasons. In the next section, we will discuss some most common purposes to start a blog.
Why Do People Start a Blog?
Now let see some common reason for blogging. You may have a different purpose than below, but that should not stop you from starting a blog.
- The majority of people start blogging to get exposure.
- Most of the people start blogging to Generate Passive Income.
- Few start blogging to shares their interests.
- Even many companies have their blogs to expand their business.
- Many people create networks through blogging.

48% of internet user starts blogging to share information or as a hobby. However, once they see the enormous potential of earning, they monetize it and turns it into their mainstream income. Many successful bloggers who are earning eight figures per month just by blogging.
Even the most famous American Magazine Forbes has listed ten most rich bloggers and their earnings per month.
| Bloggers Name | Blog Name | Bloggers Earning Per Month |
|---|---|---|
| Arriana Huffington’s | Huffington Post | $14,000,000 per month |
| Syed Balkhi | WPBeginner | $10,000,000 per month |
| Peter Rojas | Gizmodo | $3 25,000 per month |
| Michael Arrington | TechCrunch | $2,500,000 per month |
| Pete Cashmore | Mashable | $2,000,000 per month |
| Brian Clark | CopyBlogger | $1,000,000 per month |
Now the hard truth is you cannot achieve this amount overnight. It takes a lot of time and patience to create a successful blog. 95% of bloggers fail at the initial stage only. Hence you must follow a strategic way to start a blog. In the next section, we will let you know the step by step guide to creating a blog.
How to Start A Blog?
Creating a blog involves a few simple steps, but you must do it properly. To make it simple, we have summarized the steps to start a blog in five steps.
- Step 1. Select A Niche or Keyword for your blog.
- Step 2. Choose A Domain Name and Hosting for Blog.
- Step 3. Purchase Domain Name and Hosting.
- Step 4. Install WordPress on a blog.
- Step 5. Install a Responsive Theme in Blogs.
- Step 6. Write A Blog Post on WordPress.

Step 1. Select A Niche or Keyword for blog
The first step is to select a niche or topic for your blog. A niche is a topic around which your blog’s content will be. Choosing a niche sounds simple, but it is the most crucial decision that can give your blog an enormous success or failure.
In the following section, we will see how to select a perfect niche for your blog that can give success.
As a beginner, most people tend to select a popular and competitive niche such as Technology, Health, Fashion, and Beauty. Now you must consider the fact that thousands of blogs already there, and it would be challenging to get success. Hence it is best to find a micro-niche.
A Micro niche is a sub-topic under a broad topic. For example, if Technology is a niche, then mobile phones can be a micro-niche. So, you can create a blog that has content about mobile phones. You can even select a sub-topic under the mobile phone that is android, which is an operating system of mobile phones.
So far, we have discussed the importance of a niche. Now, let us discuss how to select a niche that suits your nature. Yes, blogging is not just writing random content. Your blog should represent your passion and interest. Most of the blogger fails because they select a random niche and start writing content. But eventually, they lose interest and stop blogging.
Hence you should select a topic or niche that you love to write. Below are some tips you should consider while choosing a niche for your blog.
- Select a niche that is popular but has a smaller number of contents.
- Select a niche that you love, for example, your hobby.
- Choose a topic in which you are an expert or familiar with.
- You can select a niche that is related to your profession.
- You should use keyword research tools like Ahref, SemRush, and UberSuggest, to find a less competitive niche.
As a beginner, using long-tail keywords gives high chances of ranking easily, and long-tail pro and its alternatives are best to find long tail keywords.
You can use our tips to find your blog’s niche and move on to Step 2, which is Choosing a domain name and hosting.
Step 2. Choose A Domain Name and Hosting for Blog
Choosing a domain name and hosting is a significant step for building a blog. To start a blog, you must need a hosting account and domain name. It may sound technical, but do not worry. In the next section, we will not only give you some tips but also suggest you the best hosting provider to choose a domain name and hosting.
But first, let understand what a domain name is and hosting and the factor that you must consider while choosing a domain name.
A Domain name is the name of your website that is visible to everyone. In general terms, a domain name is a name that user types in browser to visit your blog. For example, the domain name of our blog is techieblogging.com that is visible in the browser.
Web Hosting is a service that allows you to store the content of your blog in an authoritative server. In addition to saving, hosting provider also gives various service that is necessary for your blog to be visible over the internet.
Check out the post on saving money on web-hosting costs.
Step 3. Choose A Reliable Hosting Provider
You can get both hosting and domain name from a hosting provider. There are thousands of hosting providers, but without a second thought, you can choose HostGator. They are in hosting business for more than twenty years, and they have the cheapest and perfect hosting plans for new bloggers.
In the next section, we will see how we can buy a domain name and host from HostGator. Before that, let us discuss the features of HostGator that make them a reliable and cost-effective hosting provider.

- HostGator has the cheapest hosting plan that starts at 2.75$ per month.
- HostGator offers a free domain name for one year that further reduces your hosting cost.
- They offer free SSL and advanced security features to prevent online threats.
- In case you face any issues while buying their service or building a blog, you can always reach their excellent customer support.
- HostGator always maintained 99.99% of uptime rate that makes your blog always up for your visitors.
- Forty-five days money-back guarantee.
Now that you have a niche for your blog and hosting provider, the next step is to buy the domain and hosting account. As a beginner, this may be not very clear but follow the steps, and within a few minutes, you will have your domain and hosting.
Step 3.1. Visit HostGator
The first step is to visit the HostGator website. Just click on the below button, and it will redirect you to the specified page.
Step 3.2. Select Hatchling Shared Hosting Plan
Once you reach the page, you should see three shared hosting plans. As a beginner who is just starting a blog Hatching plan is the best and affordable. Later if you wish, you can always opt to upgrade to a higher plan. Just click on the Buy Button under the Hatchling plan.

Step 3.3 Choose a Domain Name
Now you must choose a domain name, and that will be your blog’s name. HostGator gives you a free domain for one year.

You must not select any random domain name. Make sure you read the tips below before you choose a domain name.
- A domain name with .com extension is better than all other extensions.
- A domain name should be short, clear, and easy to remember.
- The domain name must contain your target niche or keyword. For example, for a blog on mobile phones, mobilephones.com would be a perfect domain name.
- Do not include a word that is already a part domain name. For example, facebooktips.com, in this case, Facebook, may issue copyright complaints.
- If any domain name is unavailable, then try adding few words before or after, such as promobilephones.com. But make sure you always select a domain name with .com extension.
Now type your domain in the search box make sure at the right-hand side you see .com extension. If you see a success message, then follow the next step else try again unless you get a success message.
HostGator allows you to opt for online privacy at 1.2$ per month, but you can uncheck it to lower the cost.

Step 3.4 Choose a Hosting Plan
The next step is to select a hosting plan. You will see four options to choose from the hosting plans. Leave the first two options as it is. The first option is the name of the hosting package, and the 2nd option has the number of years.
HostGator provides three years of hosting that is best for SEO purposes. As it gives a strong signal to all search engines that you are creating a blog for the long term.
Next, you should type a unique username and give a security pin for account verification.

Step 3.5 Enter Billing Information
The next step is to give some information about yourself and the payment option. You can choose a Credit Card or PayPal as a payment option. Fill up all necessary box that has a red star mark.
Make sure you enter a valid email address as you will receive all the information about your domain and hosting details in it.

Step 3.6 Select or Unselect Additional Services
HostGator gives some additional services that provide other benefits to your blog. As these services need additional cost, you may choose it or leave it. You will find that two options you can review them and see if they are necessary for your blog.
We suggest you uncheck them because this will reduce the hosting cost, and as a beginner, you may not need them. However, you may select a Site Backup option alone as you may need it in the future for restoring the entire blog in a single click.

Step 3.7 Choose a Coupon Code
In this section, you have the option to enter the HostGator coupon code that gives you an additional discount. If you have visited through our link, then leave it as the coupon code is by default available for you.

Entering coupon code was the final step, and in the next section, we will review our order.
Step 3.8 Review Your Order
Under this section, you will see the order details now notice that the final hosting price is just 105$ for three years. 105$ for three years of hosting is extremely cheap in comparison to most hosting providers out there.
Carefully review all details, and in case of any issue, you can go up and do any kind of modification.

Step 3.9 Click on Terms and Condition Privacy Policy
Finally, click the checkbox for terms and conditions and click on the Checkout button.

Once you click on the checkout button, you will get a message like below. Your account will be ready in a few seconds, and you can log in to the HostGator Dashboard.
Step 4. Install WordPress In Domain Name
Now that you have a domain name and hosting, you should start setting up your blog. To set up your blog you need a blogging platform and a theme.
Without a second thought, you can choose WordPress.
WordPress is a universally accepted blogging platform. A user can design a blog with WordPress quickly. Moreover, you will get thousands of plugins that can add several types of functionalities to your blog.
You can follow our post on how to install WordPress in cPanel. As an example, we have used ChemiCloud Cpanel. The steps are the same. You can also watch the below YouTube video for detail instruction.
While doing the WordPress installation, you must note down or remember the username and password for the WordPress dashboard. It would be best if you had this to log in to your WordPress dashboard where you will do most of the fun work
Step 5. Install a Responsive Theme in Blog
Now you need to install a theme on your blog. A theme is a collection of templates and stylesheets that gives your blog a beautiful look. A theme decides how your blog is going to appears to visitors.
In the WordPress theme directory, you can get thousands of free themes for your blogs that you can install. However, we suggest you spend some time and select a perfect theme for your blog. You can also hire a web design expert to give your site a professional look.
Below are some tips to consider while selecting a theme for your blog
- Select a theme that is blog-friendly. You should use a theme that is made for writing blogs.
- You must select a mobile responsive theme as 37% of visitors are from mobile.
- If possible, use a premium theme as you will get many additional features plus regular updates from the theme developer.
You can install a theme from the WordPress theme directory for free, or you can upload a theme to WordPress and install it.
You can follow our post that has the complete steps to install a theme from the WordPress theme directory from cPanel. You can also watch YouTube videos for detail instructions.
If till now you have not faced any issue and completed all steps the Well Done! You have created your blog. In the next section, I will explain the fun work that is how to write Blog Post on WordPress.
Step 6. Write A Blog Post on WordPress
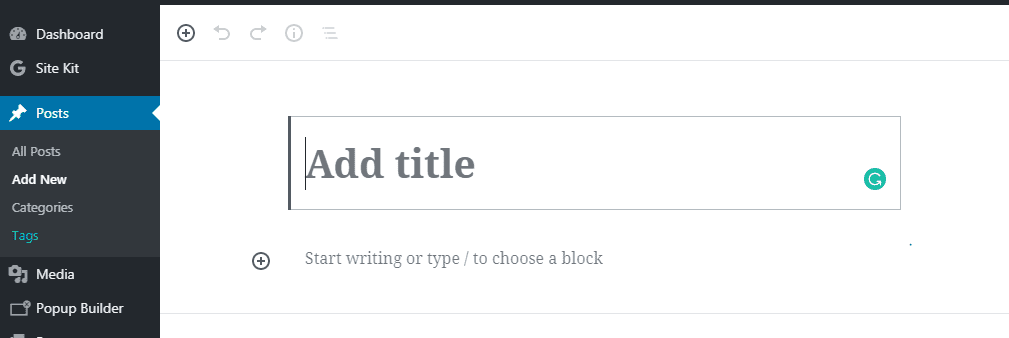
Now that you have WordPress and installed a theme. You are ready to write your first blog post. Login to the WordPress Dashboard. On the left-hand side, click on Posts and then Add New Post.

You will see the Gutenberg editor as below. Gutenberg editor is an advanced editor that is easy to use and has a lot of predefined blocks that you can use to write or insert any content.

I am sure that after spending some amount of time on Gutenberg, you should be able to write great content. However, below are some tips that you should follow while writing a blog post.
- First, write an attractive heading for your post.
- Use multiple header tags in a post like H2, H3, and H4.
- Write your keyword in header tags that look natural.
- Write paragraphs that are short and easy to understand.
- Insert multiple images in a blog post where ever it is necessary.
- Your blog post must have videos on it.
- Use the hyperlink to point the other posts of your blog.
- You should link blog posts to other websites.
- Avoid keyword stuffing. Means, you should use your main keyword in such a way that it makes sense.
- Try to write a blog of a minimum of 800 words.
You can also use SEO plugins like Yoast and Rank Math that gives a lot of suggestions to improve your writings. Once you finish your writing on the right-hand side, mention a category and tags for your blog post. Finally, click on the publish button.
Once you publish, the post will be available on the internet. You can follow the same steps to create more blog posts. In the next section, I will give you tips to grow and make your blog a successful blog.
How To Get Web Traffic To A New Blog?
A new blog is never going to be a successful blog in a short time. At least it takes four to six months to see some decent traffic to blog. Meanwhile, you should always update and keep posting great content.
Below are some tips that can increase your blog traffic in a short time.

- Share your blog post on various social media platforms like Facebook, Twitter, Pinterest, Reddit, and LinkedIn. You can use WordPress plugins like Social Poster and FS Poster to share your post to the various social media platforms automatically.
- Do guest posting and get backlinks to your blog post.
- Actively participate in forums related to your niche.
- You can launch giveaways to attract visitors.
- If possible, sell your product and create an affiliate section for it.
- Submit your blog to search engines like Google and Bing.
- Publish posts regularly so that your blog will always be visible to search engines.
- Email marketing is a great way to get visitors to a blog.
How To Monetize A New Blog?
Once you start a blog, Adsense is the most popular ad network for you to monetize your blog. But they are very strict in accepting new blogs. Your blog must have unique and great content to get Adsense approval on the first attempt. Meanwhile, you can also try alternative methods to monetize your new blog.
Now let us discuss some of the best ways to monetize your blog.
- Use affiliate networks like Amazon for monetization.
- You can promote a product related to your blog niche and get an affiliate commission. Explore affiliate networks like ShareASale and ClickBank to get various products.
- Create Software or Online Courses and sell it on new blogs.
- Offers paid training.
- Accept paid guest posting.
- You can use AdSense alternative network PropellerAds and Exoclick.
Conclusion
Starting a new blog is not easy, but that should not stop you from starting a blog. I hope our step by step guide will help you to start a blog strategically. If you face any issue while creating a blog, you can always ask questions in the comment section. We will surely help you out.
To get more such content to your mail, please subscribe to our blog notification.


